How to Get Perfect Exposure in Photography Every Time
Introduction – Stop Guessing Your Camera Settings!

Autumn in the UK is magical for photographers. The woodland floors are carpeted with golden ferns, the light breaks through misty trees, and every walk seems like a scene from a painting.
But autumn light can also be unpredictable. One moment it’s glowing through the canopy, the next it’s gone. I used to come home with blown-out highlights or shadows so dark there was no saving them.
That was until I learned one simple trick that completely changed the way I shoot. Today, I’m sharing how to nail perfect exposure every time, so you can stop guessing and start creating photos full of life, detail, and colour.
Why Perfect Exposure Matters in UK Woodlands
Here in the UK, especially in autumn, light in the woodlands can be tricky. We deal with:
Low sun angles in the mornings and evenings
Mist and fog in valleys and forests
Bright patches of sky peeking through the canopy
Getting your exposure settings right in-camera means:
No more flat, dull images
No more blown highlights in the sky
Vibrant colours that truly capture the beauty of autumn
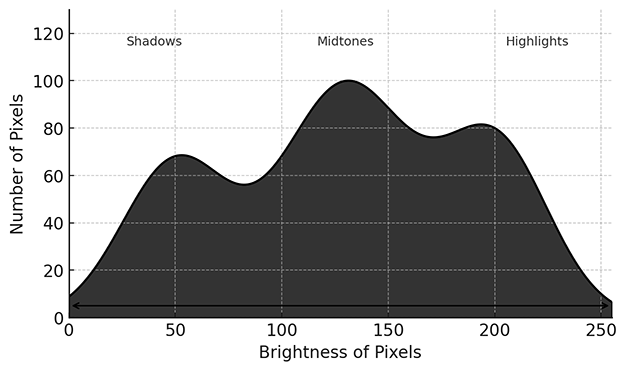
The Secret Tool: The Histogram
Your camera’s LCD screen can fool you. Bright sunlight or different viewing angles might make you think your exposure is perfect when it isn’t.
The histogram doesn’t lie.
This simple graph shows you exactly whether your photo is underexposed, overexposed, or just right. Learn to read it, and you’ll never have to wonder again.
How to Read the Histogram
Think of the histogram like this:
Left side = Shadows (dark areas)
Middle = Midtones (most of the image)
Right side = Highlights (bright areas)
In UK woodland scenes, you often want a curve that stretches nicely across the middle with no big spikes on either end. That means you’ve kept detail in both your highlights and shadows — perfect for foggy mornings or golden autumn light.
Overexposed vs Underexposed

Here’s what to look for:
Underexposed: Graph bunched up on the left. Shadows are too dark; you’ll lose detail in tree trunks and ferns.
Overexposed: Graph piled up on the right. Skies and bright leaves will turn into pure white with no detail.
Perfect Exposure: A balanced curve across the middle. Plenty of detail, no harsh clipping.
Tips for Getting It Right In-Camera
Here’s my process every time I shoot in the UK woodlands:
Take a test shot and check the histogram, not just the LCD.
Adjust exposure settings — shutter speed, aperture, ISO — until the histogram is balanced.
Use exposure compensation if your camera tends to over- or underexpose scenes.
Bracket exposures in tricky light so you have options when editing.
Shoot in RAW so you can recover shadows and highlights if needed.
Bonus Tips for UK Conditions
Mist and Fog: Slightly overexpose to keep the scene bright and airy without losing detail.
Autumn Colours: Expose carefully to keep warm tones rich without clipping the reds and yellows.
Low Light: Don’t be afraid to raise ISO slightly — modern cameras handle it well, and a sharp photo with a bit of grain beats a blurry one.
Ready to Nail Your Exposure?
This simple trick has transformed the way I shoot in the UK woodlands. With autumn approaching, it’s the perfect time to learn it for yourself.
🎥 Watch the full video here: Perfect Exposure in Photography – YouTube
And if you love landscape photography or want to explore more woodland photography tips, check out my other tutorials and print collections.